
 |
The Internet's Largest and Fastest Growing Engraving Community
Discuss hand engraving using basic to the most advanced methods and equipment
Forum Members: 14,762. Welcome to our newest member, Katherine
EngravingForum.com -
Domain since Feb 7, 2003
 Graver Video Conferencing is empty Join now!
|
|||||||
| ENGRAVING TOOLS - Paypal accepted | Classes | Glossary | Feedback | Tips | Sharpening | Bulino | Videos | Forum Policies |
 |
|
|
Thread Tools |
|
#1
|
||||
|
||||
|
(If you would like to comment on this submission, you may do so by posting a reply in this thread. Thanks! Kaitlin)
Budweiser Browning: Over the next month or so I'll be photo recording progress on the 2009 Budweiser Browning. This is a project that started in 1993 and is now in it's 15th year. Each year I engrave a Browning Citori for Colorado Ducks Unlimited. The gun and engraving is paid for by the Fort Collins Budweiser Plant. The Colorado State Chapter of Ducks Unlimited promotes the project at its local dinners with sales of Budweiser Beer Steins - each local auction winner of the Stein is entered into a drawing which is pulled during the Annual State DU Meeting. At this point the project has produced income for Ducks Unlimited exceeding $350,000. The Citori is shipped to me from Browning in-the-white. On one side of the gun I do an engraved interpreation of the current annual Ducks Unlimited State Stamp. On the other side I do a gold inlay of the Budweiser A & Eagle - Budweiser's principal business logo. I am licensed through Anheuser Busch to reproduce their logo on these projects. I'll eventually show you the entire project, but this tutorial will concentrate on the steps I take to faithfuly produce the detailed Budweiser A & Eagle logo in a flush 24K gold inlay. I also use the Ducks Unlimited logo on each gun - that logo is also recorded on the plate for future use. One year I used rose and scroll engraving for a change of pattern - you'll see a English scroll pattern I also recorded ont heleft. The gun arrived from Browning last month, I have taken it apart and will start the layout and engraving work soon.  __________________________________________________ __________ This is the original engraving plate I cut in 1998, after we determined that the project was a success and that we would be continuing year-after-year. Although I change the engraving patterns and coverage every year, the Budweiser logo is always the same. I use this plate to transfer the logo image directly to the new Browning each year. This plate also shows the engraving pattern I developed for the 1998 gun. 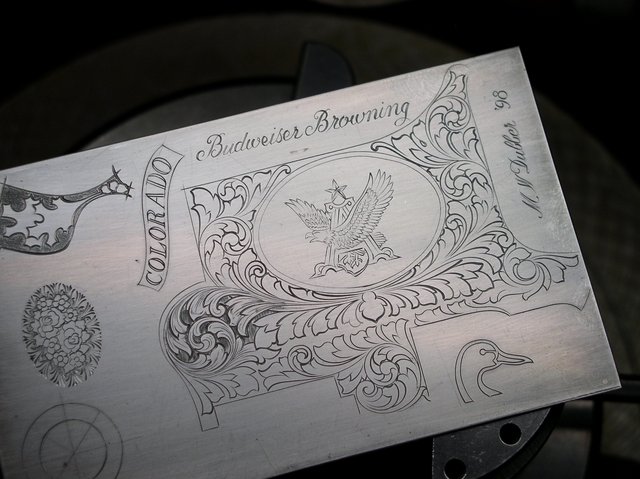 __________________________________________________ ___________ Next, I've laid out the cartouche border in which I will inlay the A & Eagle logo - the line was cut with a Detailing graver and the sides are being undercut with a chisel shaped tool to achieve the undercut - this border will be inlaid in gold. I've started some of the scroll work on the top of the action. 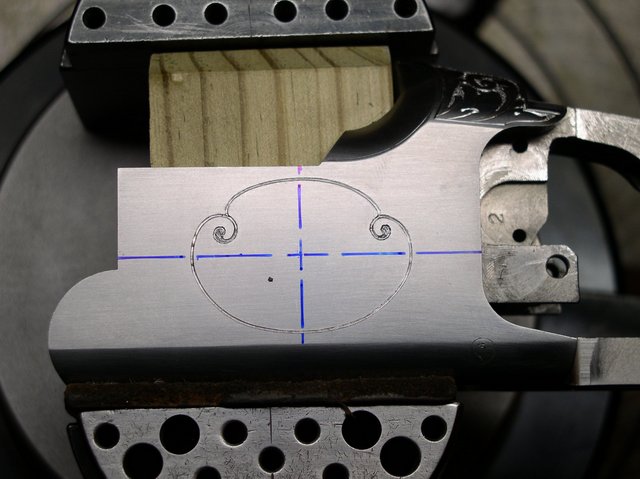 ...and the gold wire is set using the Lindsay Classic with a brass puch to hammer it into the undercut. 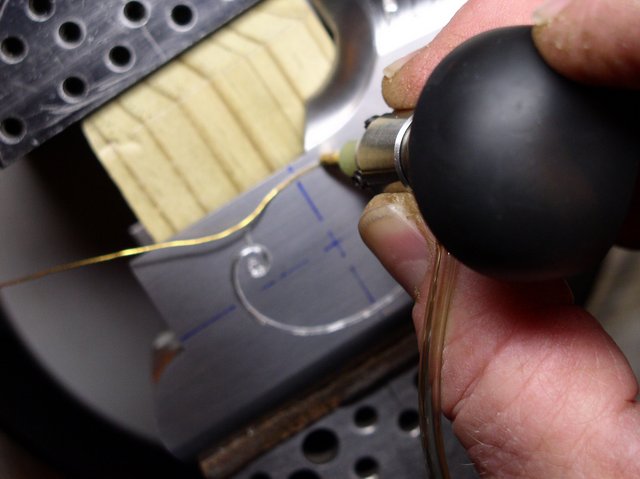 The gold border is set and I'm ready to continue with the A & Eagle inlay. 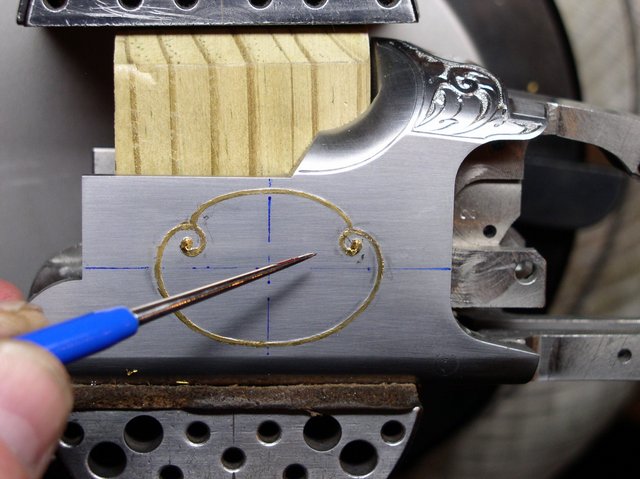 __________________________________________________ _______________ The image of the A & Eagle has now been transferred to the gun (wax transfer) and the outline of the inlay has been cut. I have stacks of Master Plates containing animals and other images that I can referrence and re-use as I need them. If I need a mule deer, I can probabaly find four or five I have recorded - the last use may have been for a line or scrulpted deer, now I may need that image for an inlay. The idea is to keep these images on plates for immediate and future use. Paper images are OK, but the ability to pick up am existing image that I created some time back, pick it up with wax and transfer directly for engraving, saves lots of artistic time. Don't be concerend abut the roughness of the inlaid gold line. That will be left for cleanup in the final steps of this tutorial. 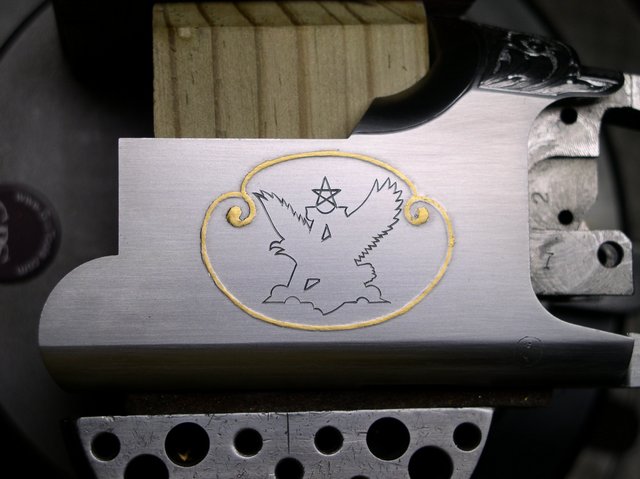 __________________________________________________ ________________ I typically outline my inlay cavity area with blue permanent marker - that allows me to see the areas better, esecially those very small areas you see inside the lnlay borders that are not to be removed. Removing metal for inlay is neither aristic nor fun, and I usually do it fast. More than once I've cut out small areas like that while I was "plowing" through to get to the next step. That causes lots of extra work, but since I started using the blue marker that hasn't happened. 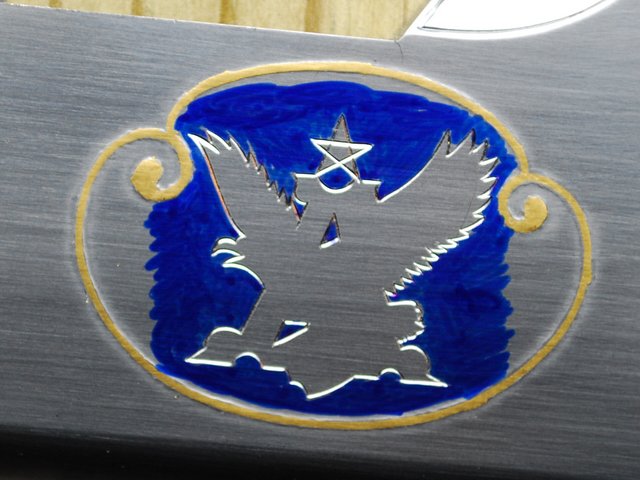 __________________________________________________ ________________ Here I have started to excavate the inlay cavity. I like to use small liner gravers to do this work - the Muller 6/8 bent liner works great. It is small (about 1/2mm wide) and the teeth of the liner help create a good surface for the next inlay process. I like these more than flat gravers. You can see that I've cut the bend of the original liner contour back so that I have about a 15 degree "heel." The factory the "bend" is 30 degrees - way too much for this purpose. I've also removed material from the top of the graver to creat a more streamlined look that allows for viewing space - especially while working under the scope. 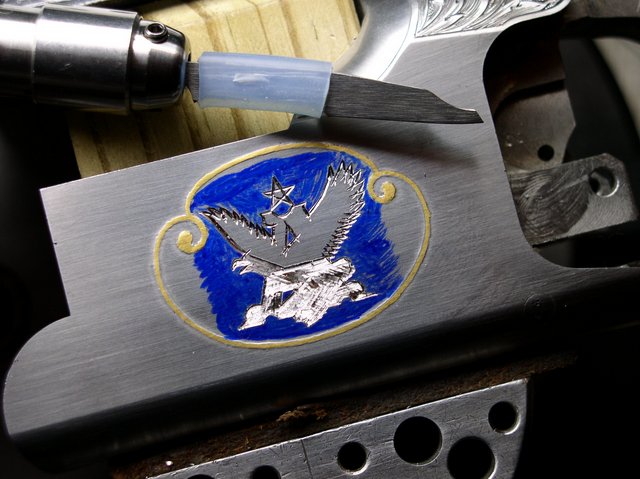 __________________________________________________ ________________ The inlay cavity is now completely cleaned out, flat on the bottom with a consistent depth of about 1/2 mm, and the edges have been "raised" or undercut with the same flat chisel I used to undercut the border. Close examination will reveal that all the edges have been disturbed - or "Lifted." The second photo shows that I have cut 90 dgeree parallel lines accross the entire cavity - each of these lines have also been undercut with the chisel  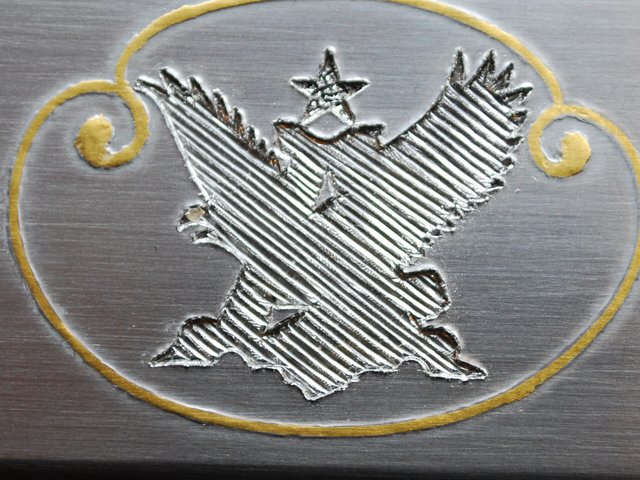 __________________________________________________ _________________ Finally, the entire cavity is cross-cut with the same chisel to create hooks of steel that will bite into the gold wires as they are set. Depending on the size of your screen, you may be seeing this illustration at 2 or 3 times its actual size. The hooks could only be appreciated by running your finger across the bottom of the cavity. The points of the cross-cut are very pointed and sharp, and, since they are very much harder than annealed 24K gold, they easily grab into the gold as it is set. I've removed gold from similar cavities and close examination also shows that as the hooks grab and sink into the soft gold, they also start to bend over as the setting process continues. That firmly locks the gold inside the cavity! 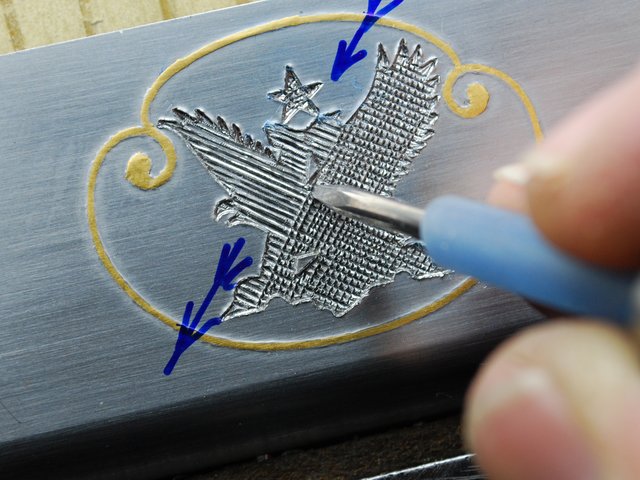 __________________________________________________ _________________ The inlay process is now started. The wires (20 ga. 24K gold) are punch set in the direction of the chisel cross-cuts. Setting is accomplished with the same brass punch - made out of 1/8" brazing rod and continously "Textured" on a small sheet of 180 grit sandpaper glued to my bench. Texturing the tip of my punch causes it to bite the gold wire as it is set. No texturing allows the punch to spread the gold outwardly instead of punching it down. Notice that in "1" that the gold was allowed to overspread the pointed feathers - in "2" notice that small areas of cavity left over are filled with small pieces of gold that were angled to fit the initial cavity shape and then cut off with a flat graver at the proper ending angle - it is not yet set in in this photo. At "3" you'll notice where I stopped and started the gold wire before and after the raised cavity boss. Also recognize that the gold is not entirley set. It is, perhaps, set at about 85% of it's final level. All the wires are set at this level until the cavity is filled. The final step before "flushing the inlay" to the level of the surrounding metal will be to set it 100% and really make the wires "cold weld" into a solid sheet of gold. Technically, they really don't weld together, but the molecules are so closley hammered together that you will not be able to see parting lines. I should also mention that as much as possible, try not to allow the gold lines to overlap one another as they are set.  __________________________________________________ ___________ OK, the A&E inlay is entirley set and ready to "flush" with the surface - but first, since I will be flushing the entire side of the action, I laid out additional decorative lines for inlay as well. The two sides panels are essentially the same design, but the rear set has been stretched to fit the action boss at the top and contracted to fit the smaller space at the bottom rear. It seems like and easy thing to do, but it always challenges me to make these small adjustments and make them match esthetically. 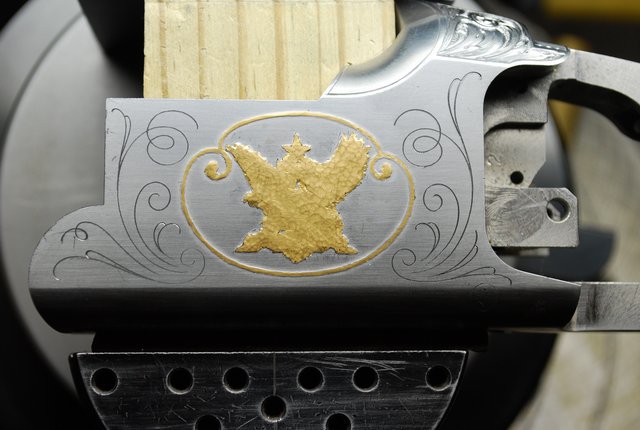 __________________________________________________ ____________ Undercutting Punches: OK, there have been lots of questions and it's time to break and describe the "undercut" graver I've been using and how it creates the undercut and upsets the edges in preparation for setting gold. The tool is shaped like a small chisel. There are three shown in this photo, each of a different size (large to small, right to left) and they are all three shaped exactly the same. I also positioned each of them to show the progression of the face from front to side. You will see that they have a slight roll across the face of the tool - that's to keep the tool from sticking in the undercut as I drive it along the line with the PalmControl or Classic. It's very easy to see the edge of the metal being upset and undercut. It only takes a little upsetting to create the undercut and raised edge. The tool is hand-ground and polished bright. Logically, for a long stright line of inlay I would use the large faced tool - for tight curves I would use the small. I also have some for inlaying letters that are very small. For letters that are 1/16" or smaller, I use my hammer to chase the outside edges of letters. It's only necessry to raise letter edges a tiny bit and the curves ares so tight, that air gravers just work too fast for that application. 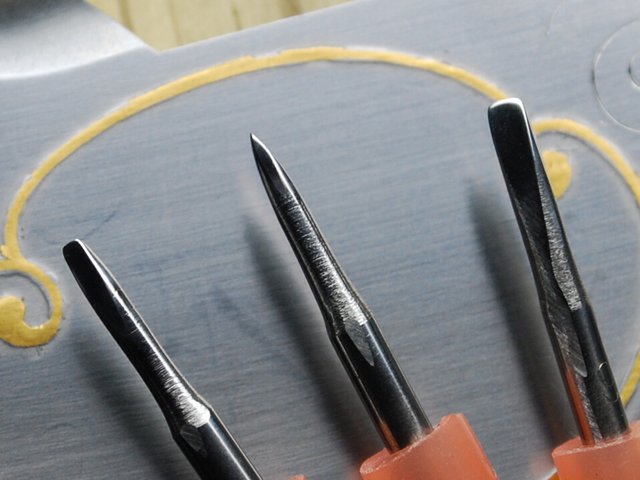 __________________________________________________ ________________ In this photo I've completed undercutting the edges of the decorative scrolls with the chisel punches seen in the previous shot. Gold has been completely set into the left panel and it is started on the right. Logically, as I approach wider inlay areas I simply switch to heavier gauge gold wire and continue setting the inlay void. In setting the left panel I used four different gauges of gold wire. As always, my brass punch sets the gold tightly but does not damage the surrounding metal - and I keep it textured on the face by repeatedly buzzing it on a sheet of 180 grit sandpaper as I work. You can see that the face of the punch is starting to spread and mushroom from the setting process. I'll soon need to reshape this punch. 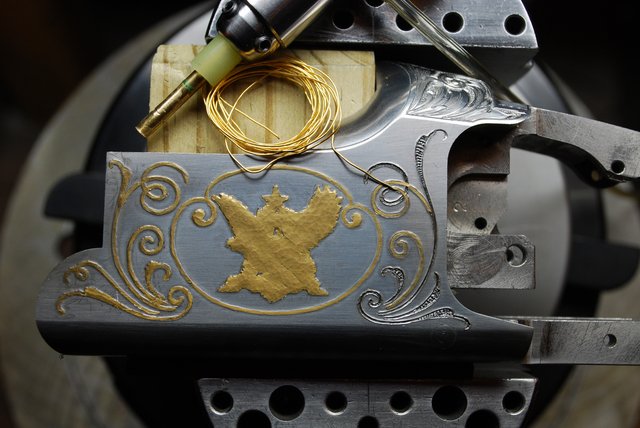 __________________________________________________ ____________________ I'm ready to start "flushing" off the excess gold material and bringing it level with the steel surface. For large flat areas like this Citori I like to use a draw file (obtained from Bronwells). I also use it on slightly radiused surfaces like floor plates. You can see that I also use file chalk with the draw file. This prevents "pinning" (filling the cuts of the file with metal) and it also prevents file wear. In this shot the file has been loaded with chalk. 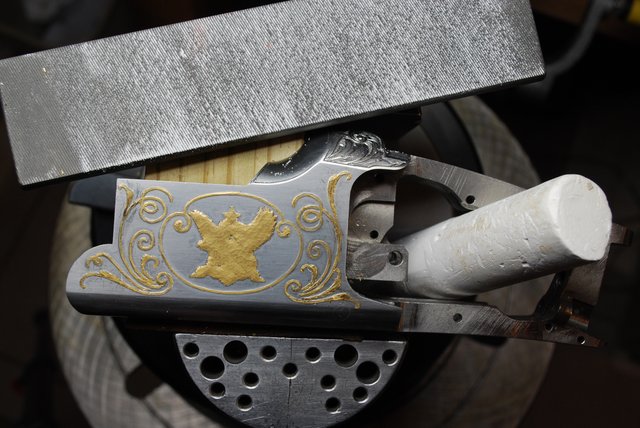 __________________________________________________ _____________________ The draw file only cuts in one direction, and typically one positions it to cut as it is "drawn" or pulled toward you. "Pushing" the draw file away from you causes chatter. In this photo I am drawing the file across the surface and it is cutting off the excess gold. That excess is being captured in a paper tray I place below the work area and between the vise jaws. All the cuttings are saved for refining. The correct technique is to pull the file under pressure and then releasing that pressure as it is pushed on the return stoke - meaning that the file is not lifted from the surface on the light return stroke. You can see the gold filings accumulate in my paper "catch" tray. 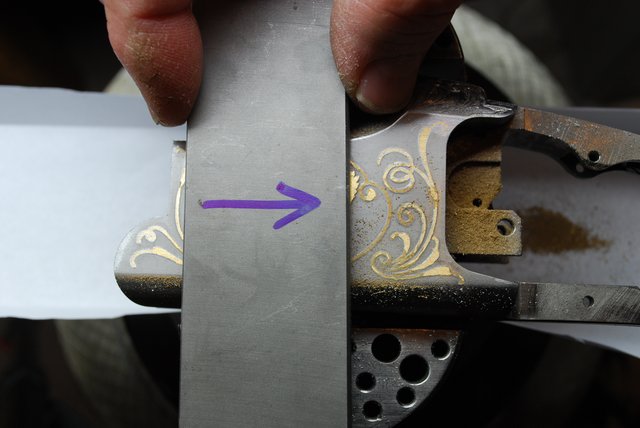 __________________________________________________ _____________________ The entire surface has now been leveled and draw filing is has been completed. 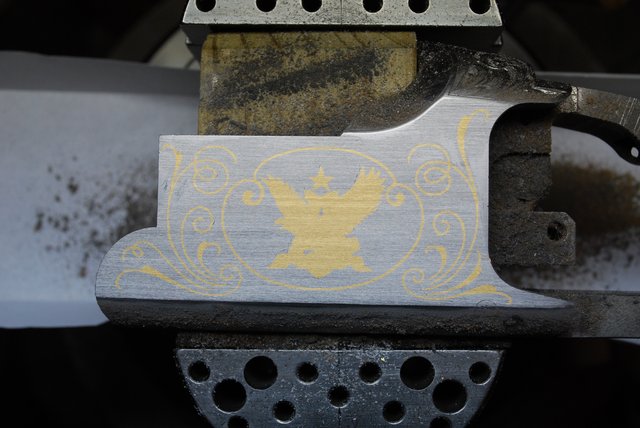 __________________________________________________ ______________________ Now I porceed by using a flat hardwood block and succeeding grits of wet and dry sandpaper to clean up the file strokes. I start with 220, then 400, then 800 grit papers...and I use honing oil for fluid. 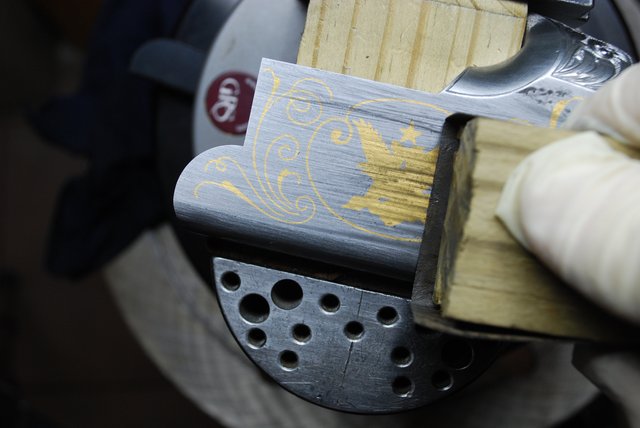 __________________________________________________ _________________________ Finally, I use a hard rubber eraser to pad 1200 grit paper and create a smooth final finish. I'll use more after cutting the details into the Budweiser A & Eagle inlay. The time required to level or "flush" the entire inlaid surface was 35 minutes....and it took about 1/3 ounce of 24k to fill the entire side. 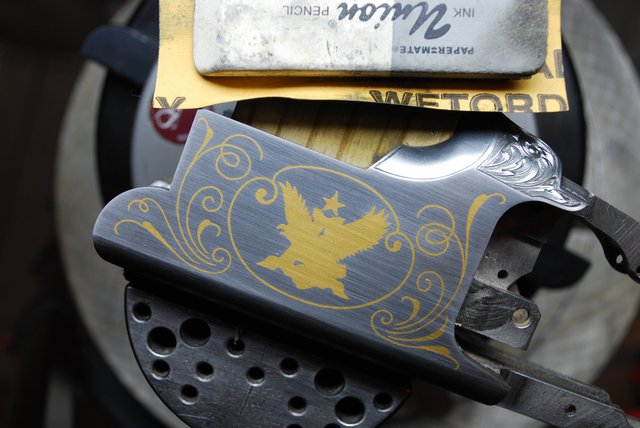 __________________________________________________ ________________________ Before going on to the opposite side of the action I finished the bottom. All fifteen of the Budweiser Brownings have the Ducks Unlimited logo inlaid somewhere within the engraving patterns. 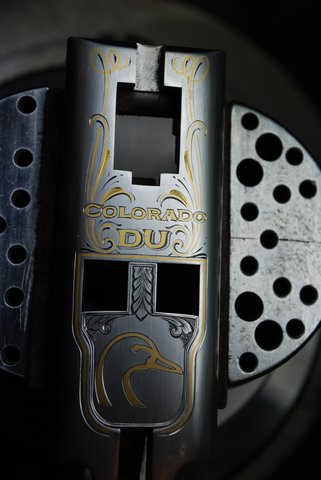 __________________________________________________ _______________________ |
|
#2
|
||||
|
||||
|
I am working my way around the action of the Browning Citori. This is a photo of the top of the action, release lever and safety.

|
|
#3
|
||||
|
||||
|
This is my engraved interpretation of the e-mail Duck Stamp image sent to me by the Colorado DU Regional Director - the birds are part of the 2009 Colorado State Waterfowl Stamp. As in most other States, winning images are picked from entries of original art-on-canvas paintings submitted by artists in open competition.
The ducks and decorative gold scrolls were inlaid the same manner as shown in the progression of the Budweiser AS & Eagle inlay on the opposite side of the action.  __________________________________________________ ___________________________ |
|
#4
|
||||
|
||||
|
The Lindsay PalmControl was born for this kind of fine detail!
Furthermore, the lightness of touch allows the engraver to engrave on soft 24K gold with confidence. I used the PalmControl at its lightest setting and it took very little "push" to accuratley guide the Lindsay System Universal grind graver throught the cuts. This Browning Citori action was hand-polished to a very bright sheen and good photography (for me) was difficult, but you can see some of the detail. 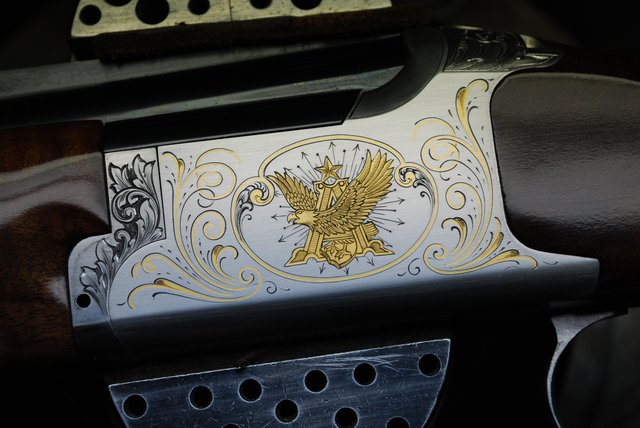 Now I'm ready to return it to Browning for bluing and reassembly, and after that it will be forwarded to the Colorado Ducks Unlimited organization so they can start promoting the gun for the State auction. It will not be possible for me to show the 2009 gun on this Tutorial after it is blued. __________________________________________________ _________________________________________________ What I can show you is a photo of the 2008 gun. This is the 12Ga. Browning that has been around the various State of Colorado DU Chapter Auction Dinners during the past year. A Budweiser Beer Stein has been sold at each of the 92 local banquets - and the name of each of those aution winners will be placed into a barrel for a final raffle drawing. It will be awarded to the new owner at the DU State Convention this month! 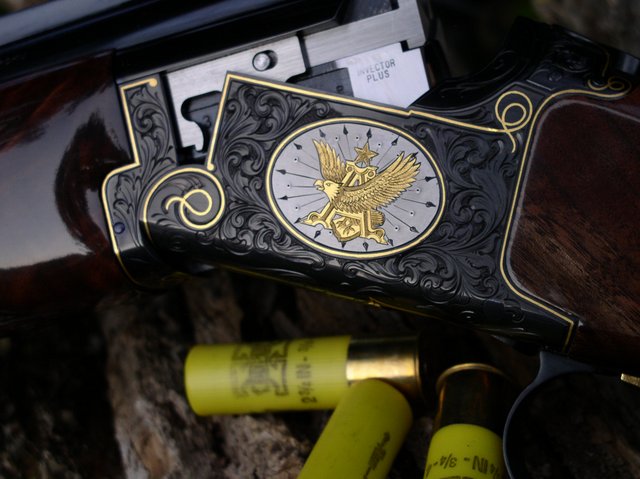 __________________________________________________ ___________________ "Raised Inlays" Now, let's take this one step forward: using the exact same process we can also create "raised gold inlays" using the same wire inlay techniques, but, instead of filing off the surface to make them flush, we can model them to creat the raised effect. The following photos are of a Colt SAA work-in-progress - the first shows the identical cavity process as in the Browning Bud Gun. 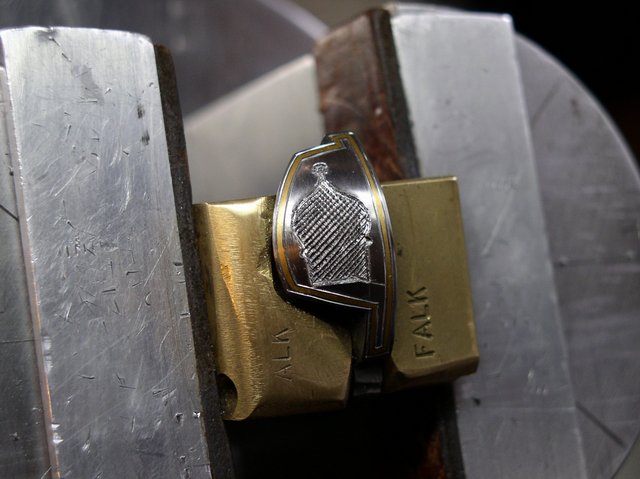 The wires were inlayed (gold and platinum in this case) as before, the Colt Dome was modeled and the background was removed to create an higher raised effect. 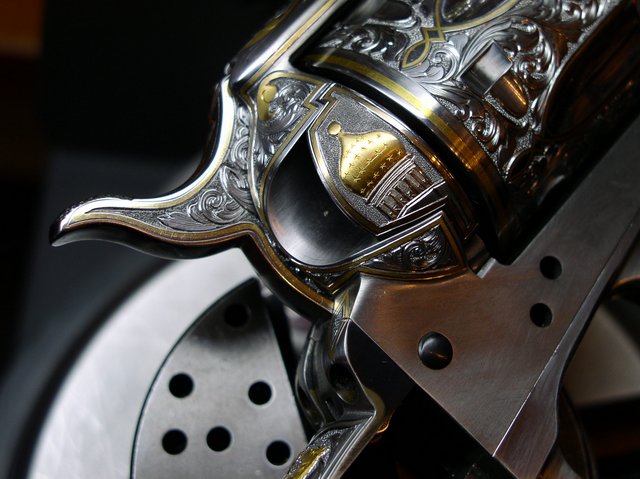 __________________________________________________ _________________ And.....this antique Doulble Colt Inlay was done using the same techiques. 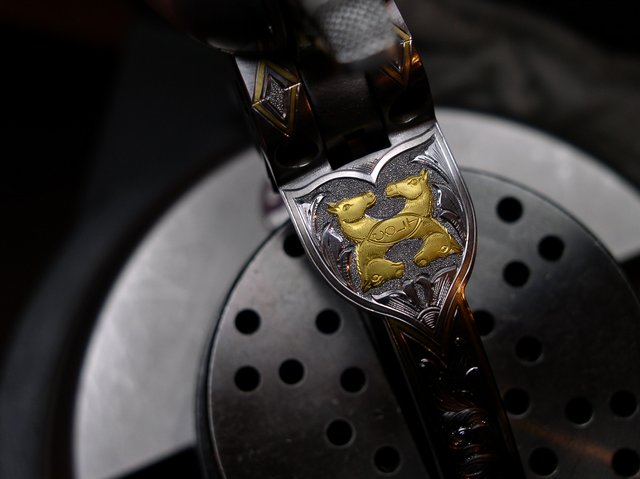 __________________________________________________ __________________ I sincerely hope everyone enjoyed this tutorial. I'm sure that it generated many additional questions. If you want to study these techniques further and in detail, please watch for my class offerings for 2009. Thanks, Mike Duber |
 |
| Bookmarks |
|
|