
|
The Internet's Largest and Fastest Growing Engraving Community
Discuss hand engraving using basic to the most advanced methods and equipment
Forum Members: 14,748. Welcome to our newest member, Kyle6547
EngravingForum.com -
Domain since Feb 7, 2003
 Graver Video Conferencing is empty Join now!
|
|||||||
| ENGRAVING TOOLS - Paypal accepted | Classes | Glossary | Feedback | Tips | Sharpening | Bulino | Videos | Forum Policies |
 |
|
|
Thread Tools |
|
#1
 12-10-2008, 07:15 PM
|
||||
|
||||
|
These are some new champleve earrings with pink sapphires and 14K gold. This is my second chempleve piece and were produced for my inventory. The first champleve I did was for a commision. They are of course glass fired enamel filled into the engraving. I overfilled them, then they were fired and the enamel ground down to expose the pattern. Some detail can be lost doing this so it's good to over cut them then grind down to the detail level desired. These are experimental and I would like to do more in time.
14K pink sapphire earrings 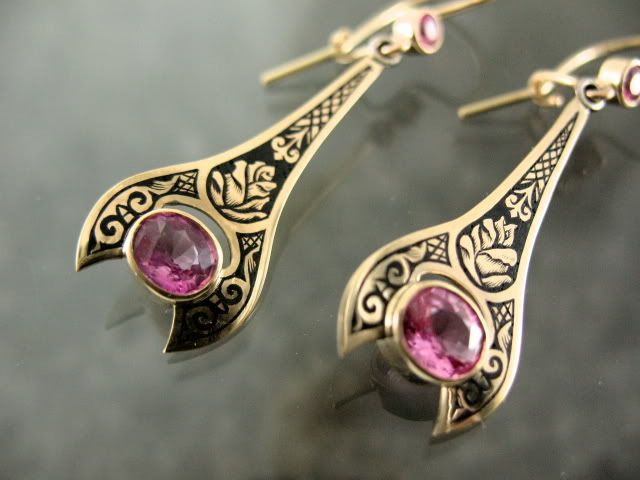 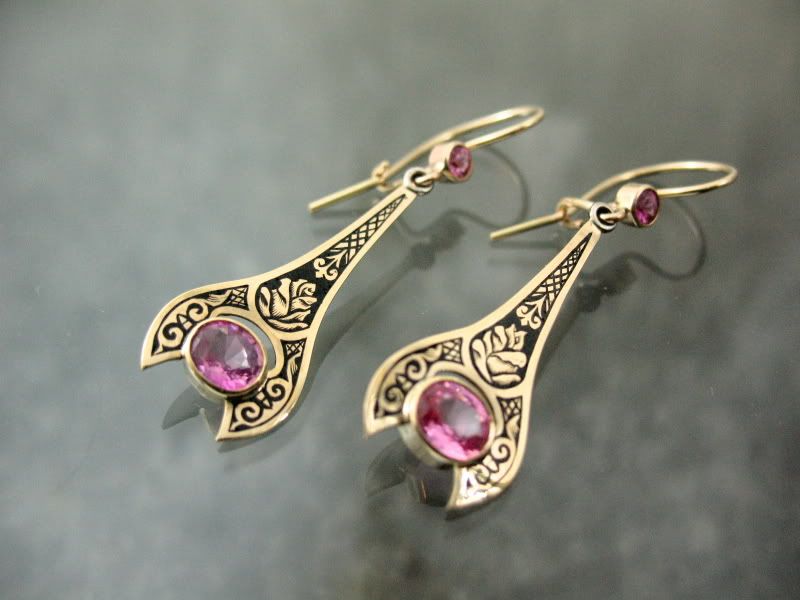 Here is my first champleve piece, an extension link for a bracelet 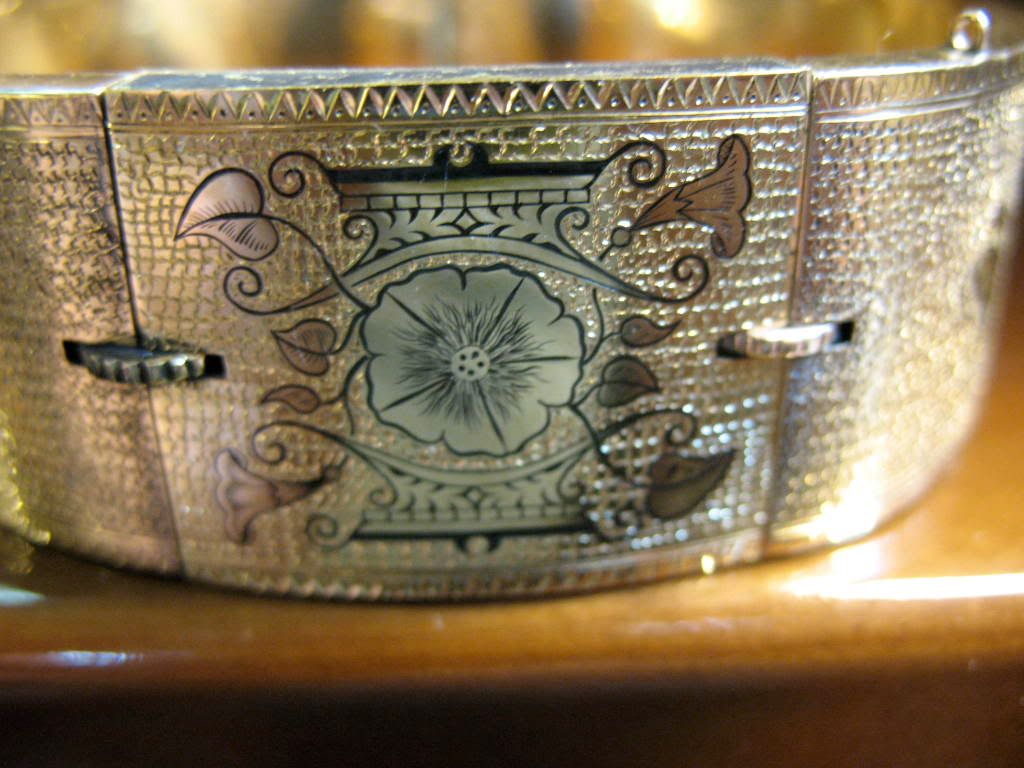

|
|
#2
12-11-2008, 01:01 AM
|
||||
|
||||
|
Hi Jroettger
My wife says those are pretty and I have to agree with her  Am I correct in that the design on the bracelet link is inlayed? If so what metals did you use?
|
|
#3
12-11-2008, 08:43 AM
|
||||
|
||||
|
Thanks Spider cut, The bracelet link is one flat piece of sheet. First enameled then engraving was added to the finished surface. I've seen a lot of antique champleve where engraving was added to the finished champleve. i like the idea of making the black enamel both positive and negative image wise as well as adding engraving to the finished enamel. That is sort of my ideal champleve is when it works on those three levels image wise. Unlike inking which needs to remain negative, the black enamel lends itself to a positive image form as well.
|
|
#4
12-11-2008, 11:25 AM
|
||||
|
||||
|
Very nice!
As it happens I took a workshop on Enameling not long ago. Part of the reason I took it was because I thought enamel would make for a very interesting 'filler' for engraving. Haven't played with it because I didn't have a kiln. But then I needed a small kiln for something else and the ever-indulgent wife decided to buy me one so now... Question: in the enameling workshop they stressed the need to enamel both sides of the work so that the differences in thermal expansion wouldn't crack the enamel free. Since you mention antique champleve that doesn't seem to be a problem in this case. I'll have to search out information on champleve but can you give us a very basic overview? I'm guessing it's just cutting a somewhat deep relief area, wet-packing in the enamel (or sifting if covering a larger area) and then firing it, with sanding down to the pattern as needed. Do you do a bit of undercutting on the relief areas to help secure the glass? I can see having some fun with this.
|
|
#5
12-11-2008, 12:16 PM
|
||||
|
||||
|
Thanks Steve,
I posted a tutorial last year when I did the link piece: http://www.engravingschool.com/forum...ead.php?t=1430 Counter enameling isn't needed typically because the enamel essentially has a "perforated" surface because of the design. If you had a fairly large open area of enamel you might need counter enamel but virtually all of the antique champleve I've seen has no counter enamel and avoids large open areas as well. Mixing in the raised gold (hence champ leve or field raised in english) is of course the fun part so this breaks up the surface tension enough to not need the counter enamel. Covering the piece completely then grinding away the fired enamel works better than trying to just fill the lines. When you cover the whole piece it is protected from oxygen during the firing and fills in better with less pits than if you just tried to fill the lines. Some people refire the enamel after griding down to glaze it. I just polished these as anytime you refire a new risk is taken. These were done on .5mm thick sheet. Also, you should avoid commercial alloys for the gold sheet as they contain elements other than just gold, silver and copper. I make my own alloys and roll them out myself. Some places do sell enamel recommend 14K alloys. Using the wrong alloy will cause the enamel to lift off. I don't undercut at all. But it's is best to over cut then sand down to the desired level. This over cutting is something I still need work on. Also, unlike these flat earrings I made. Try to avoid working on flat surfaces as the are not as strong or stable as a domed surface. After I fabricated these earrings before firing them I kicked myself wishing I had puffed the pieces before assembly. But this would have required several more hours of repousse work and I was feeling experimental and expeditious.
|
|
#6
12-11-2008, 06:05 PM
|
||||
|
||||
|
gorgeous

|
|
#7
12-12-2008, 08:33 AM
|
||||
|
||||
|
Thanks for the reminder on the tutorial - I read it then but since I didn't have a kiln....
So for line filling you want to do a sift-over of the enamel, making sure the lines are filled and letting a thin layer cover the whole surface to help make sure you get full coverage, then working back to the 'clean' surface afterward. I was thinking more of just filling the 'background' areas in a scroll - the bits we relieve down, stipple, and paint. Due to the need to keep better control over the placement that seems more like a job for wet-packing (wetting the enamel with water+fire scale preventer and using a fine brush to transfer it into the area). In the workshop I was taught that it's better to put a little too much and sand it down than too little. Sounds like if I keep the areas smallish then there won't be enough expansion difference to let them crack / pop free. Probably a good idea to leave the floor a bit rough too? And it also sounds like a flat area is the most vulnerable - makes sense due to the fact that being flat would keep all the stresses concentrated in the one plane. When I get a chance (lots of stuff in my ToDo list) I'll cut a shaped scroll pendant in silver, dome it lightly, and take a shot at filling the background areas with enamel. Could be months at my current rate but that's ok - it's good to know I'll probably never run out of new fun things to try!
|
|
#8
12-12-2008, 09:51 AM
|
||||
|
||||
|
I like to use a drop of gum arabic and spit and a bit of water as a medium. The gum holds it and the spit creates surface tension for smoother filling. I've never tried a firescale blocker as you describe. I take a fine brush and apply it heaping over the areas to be covered rather than sifting it all over the place as would be the case with the link piece shown above. It's kind of like casually applying a thick heaping line over a fine line cut to fully cover it. This also is only traditionally done with black or blue. However I have done it with bright colors on a few rings years ago but those were with wax carved designs which were cut much deeper and vertically to the surface. These were engraved in the traditional champleve technique.
|
|
#9
12-12-2008, 11:11 AM
|
||||
|
||||
|
Gum arabic is easy to find and as long as you've got water spit's easy to come by so I think I'll try your method when I get around to it.
Thanks for all the info! If there's another Tutorial contest you might consider one on this technique.
|
|
| Bookmarks |
|
|


