
 |
The Internet's Largest and Fastest Growing Engraving Community
Discuss hand engraving using basic to the most advanced methods and equipment
Forum Members: 14,762. Welcome to our newest member, Katherine
EngravingForum.com -
Domain since Feb 7, 2003
 Graver Video Conferencing is empty Join now!
|
|||||||
| ENGRAVING TOOLS - Paypal accepted | Classes | Glossary | Feedback | Tips | Sharpening | Bulino | Videos | Forum Policies |
 |
|
|
Thread Tools |
|
#1
|
||||
|
||||
|
(If you would like to comment on this submission, you may do so by posting a reply in this thread. Thanks! Kaitlin)
Hello folks .... I believe I will jump in this since the completion deadline isn't till September. I finally got a project that didn't begin before the contest started and something that I can complete before it ends. After hours of pacing the floor, staring at the walls of my studio/bunker and wandering aimlessly through the woods in an effort to qualm the manic, obsessive compulsive, self inflicted anxiety of whether or not I can pull this off ... you'll have a chance to see exactly what I have come up with. It's all in my head right now ... only the task of making it tangeable remains. This project will be a multi-dimensional silver cuff bracelet. It will be made from standard sterling, Argentium sterling and maybe some gold. The techniques will be taken from readily available firearms engraving tutorials and will also include western bright cut engraving. There are a number of techniques that I will be learning along the way such as sculpted scroll and silver soldering. Sculpted scroll is a hint but 3 dimensions is simply NOT enough!! This bracelet will be professionally photographed and entered in a jewelry competition upon its completion. The silver will show up Monday. I'll put some artwork together over the weekend. All 100% original drawings will be used. So ... grab a chair and a cold drink and enjoy and learn with me as I take this different idea from concept to completion. Chris |
|
#2
|
||||
|
||||
|
Hi folks ... not a whole lot to see yet since the silver came late today.
I'll get into the details of this project. I'm using two pieces of 22 gauge sterling silver sheet. One is Argentium and the other is standard sterling. This bracelet will be an "open-work" double layer bracelet. Definition of "open-work": A piece of jewelry that has open areas, see-through, similar to filigree cut. The top piece will be vine scroll cut using Ron Smith's tutorial on transition cut scroll. (I'll post a link when I get to cutting). The scroll will be outlined with a square, sculpted using a flat graver and also a large round heeled graver. The background will then be completely cut out thus creating the "open-work" filigree part of this bracelet. Edges will be filed and sanded smooth creating the 3D effect. I would have preferred 20 gauge for the top piece but when you go thicker on a cut out, you run the risk of the filigree not forming well around the mandrel and "popping" up in areas of its' weakest connect points. 20g would probably work fine. The bottom piece (Argentium) will be engraved using Western style bright cut for maximum light refection out of the design. The two pieces will be soldered together, one on top of the other, when completed.....hence, "multi-dimensional" Why am I using Argentium on the bottom ... because I want the bottom peice to always retain its reflectiveness. The top will be antiqued. There are a few other finishing details I will include when I arrive at each of the major steps. As we move forward, this stuff will begin to make sense. I have a tendency to "over-engineer" things to minimize the possibility of failure. Rather ironic since everything I try that I haven't done before is a risk in itself!!!!! This tutorial is intended for the intermediate (or even relatively new) engraver with only basic tools in the shop. You don't need to be a jeweler or silversmith .... just a "jack of all trades". This is a low investment, high output project. It takes time and pressure to make a diamond and that's all you need here is just a little time and a little (cutting) pressure. I may take the long way around the barn on some of these steps and there may be a more efficient method that the "gurus" use but being a jack-of-all-trades, master of none, intermediate engraver kinda guy .... that's just the way I do it. You will need this stuff .......... 1. Power assist engraver 2. A jewelers saw and work holding clamp 3. belt sander 4. small files and fine sand paper 5. liver of sulfur or black max .............also stuff I will show you (there are really no pre-requisites here in this tutorial ... just the desire to take a risk and a steady hand) 1. basic Western bright cut engraving and the tools (as well how to sharpen) this will be the nickel tour to get you going. 2. The challenging task of cutting out the background with a jeweler's saw 3. Transition scroll (which is just vine scroll with western bright cuts) and the tools .... this we'll be learning together. ------------------------------------- The below photo are the two peices of silver cut to 1.5 inches width. Standard length is 6" as seen here. The sheet was purchased from Rio Grande. Normally I use ccsilver.com because they are much more reasonable but they don't carry Argentium. The pieces were scribed at 1.5" and run through the scroll saw (or cut with a jeweler's hand saw if you don't have one of those) Also marked the Argentium with an "A" ... because I WILL mix these up if I don't.  Here I have rounded the edges and squared up the sides on a belt sander. I'll also lightly sand with 1500 or 2000 grit paper (wrapped around a small block) to get out minor scratches.  Oh yeah .... over the weekend, I flipped through this book for brain food on an "art nuoveau" idea for the "open-work" filigree ..... Treasury of Ironwork Designs: 469 Examples from Historical Sources (Dover Pictorial Archive Series) |
|
#3
|
||||
|
||||
|
Well ... just as my audience has gotten comfy ....
 I've decided to go to a thicker piece of silver for this "open-work" ... I will need to order 20 gauge for the top. I could proceed with 22 gauge but there just isn't enough "meat" to work with. I could just 2 dimensionally shade the silver but I really want some 3D aspect to this. Here's a quick design I've come up with. "KISS" as my Dad always says ... "Keep it Simple Stupid" ... hmmm sometimes I wonder if he was referring to me. Anyway ... leaves have been truncated because we want a lot of open space. I've shaded part of it to give you idea what it will look like. There's going to be alot going on in this piece so keeping it simple won't actually look so simple in the finished product. Especially after it has been bent around a mandrel. I'll think on this design while I wait for the thicker silver to show up.  I've left a border around the inside of the edge for any heat issues that might come up with the soldering. This also gives me some space to either do an engraved border of something different or solder some silver or gold chain there and on the outer edge. The "x" marks indicate the materal that will be sawed out. Connect points have been strategically positioned by guesstimation and these will support the entire design as it is formed around the mandrel. Thanks for lookin' on ... See you when the thicker silver gets here .... either Friday or Monday. ....................Chris Last edited by WVEngraver; 08-05-2008 at 03:55 PM. Reason: added |
|
#4
|
||||
|
||||
|
Looks like this is on hold for a bit due to an illness in the family.
This bracelet has already been sold so it will get finished. Hopefully I will be able to pick up this tutorial in a week or two .... if not, I'll still post the finished bracelet and answer questions. Maybe I'll update with a refined design but I won't be cutting silver for a bit. Later ...... for now, Chris |
|
#5
|
||||
|
||||
|
Alright I'm back!! Thanks to those for their concern and prayers ... Dad's doin' great after bypass surgery and we can eat all that beloved fried grease together again!! Praise the Lord!!
It's been difficult to get back the momentum and I had to clear a path to my desk and get a bunch of stuff finished. There will be a lot of info thrown at you in a short time so first I am going to get into the Western bright cut portion of this project ... in particular ... the tools and tool preparation. Two sources of self study have been crucial in teaching myself this style: 1 Cowboy Engraving video by Jeremiah Watts and FEGA Newsletter issue # 76 with a great article by Diane Scalese. I always stressed the importance of joining FEGA because of the Biblical amount of info in that newsletter. Back issues are available but I think individual articles should also be available if the back issue is forever sold out. Pester them!! The J. Watt engraving video is available from GRS. As a side note/disclaimer ... I will buy my study materials from whomever simply because I want to get the job done and I want to learn as quickly as possible. As you know, I'm using a GRS Gravermax. It has served me pretty well but I believe Steve has the best handpiece going and that's why I'm here in this contest. I may make reference to study resources and tools from competitive operations but it doesn't mean I'm shilling for one corporate interest or the other. Seriously ... who cares ... let's just git-r-dun. As for the J. Watt video ... get the DVD if it is available. I bought the VHS cause that all there was. I digitized it to the computer and took out all the commercials and B.S. There's only 13 minutes of actual cutting in the video but along with the sharpening it illustrates, it has paid me back 100 fold. For this project I will use the most common tools ... 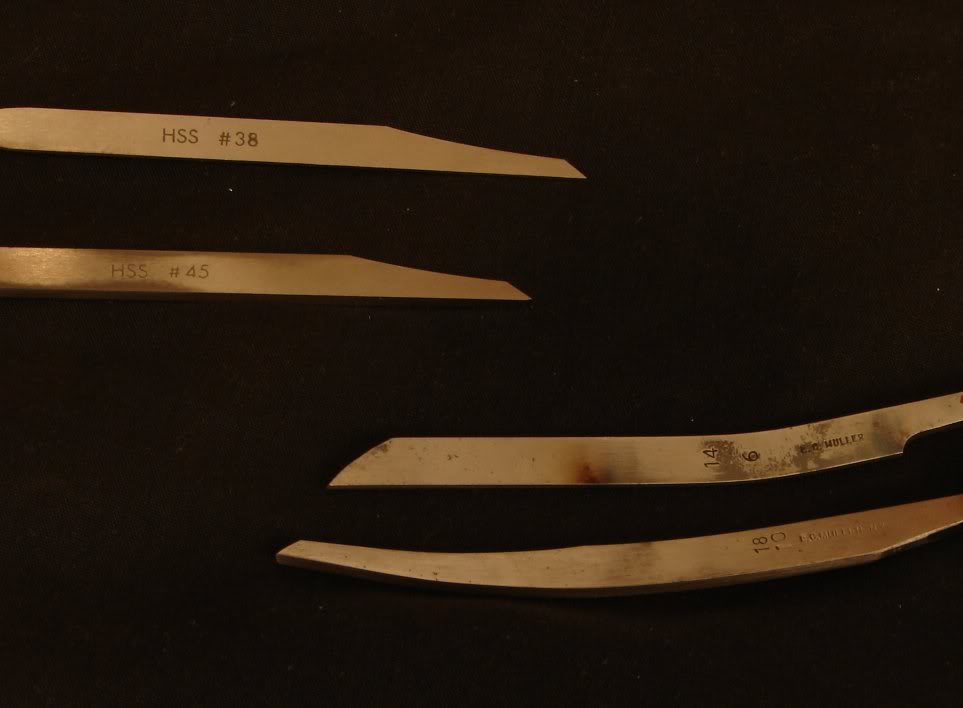 1. A #38 flat for wriggle cutting backbone. This is sharpened with a 40 degree face and a long (1/32") 15 degree heel. Both faces are polished on a porcelain wheel with diamond spray. 2. A #45 flat for the bright cutting. This has a 37.5 degree face and a long (1/16") heel. Both faces are polished on the porcelain wheel with diamond spray then the heel and face are polished again with Norton 4/0 paper to remove any grooves (scratches or facets) that run the length of the tip from grinding. Believe it or not ... the porcelain wheel ain't fine enough to get these out. I bought several sheets from Contenti a couple years ago and it has lasted quite awhile. 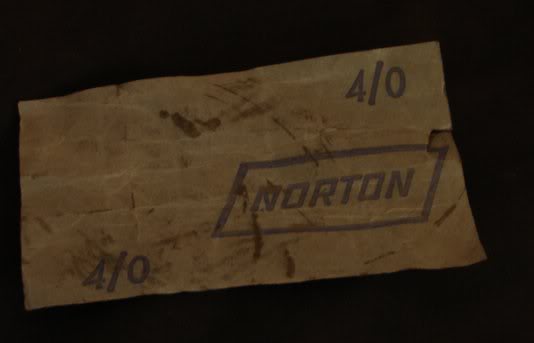 The graver is lightly moved from side to side across the paper (the more worn the better) until all sharpening "lines" polished out. This will produce the smoothest and brightest cut in the silver. This is a very important step and one you do not want to leave out. The quality of your work is reflected in the quality of your cut .. (nopunintended). 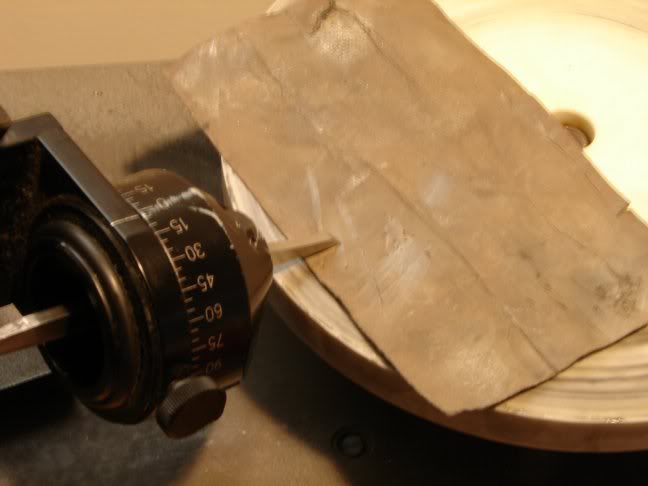 Finally ... the liners that I will be using .... 3. A 14-6 for small scroll 4. A 18-10 for larger scroll These can be purchased curved or you can heat them and bend them in a jig. This helps you move around the silver without damaging other areas of the work. For sharpening these.... 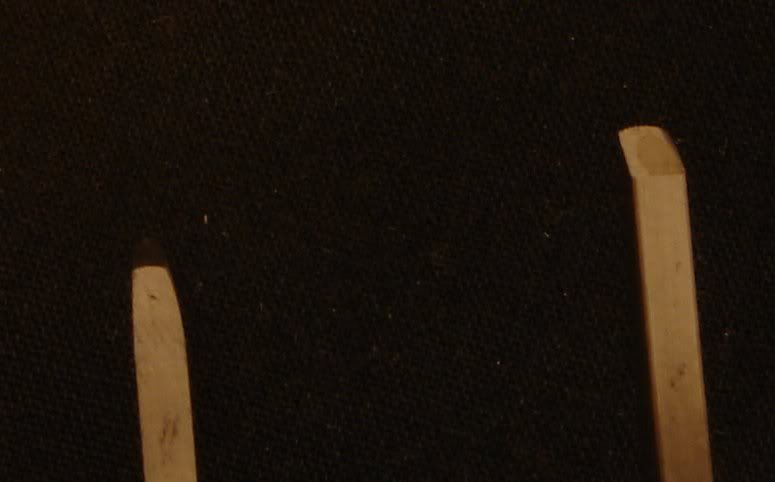 Give these a 40 or 45 degree face then round them by "rolling" the face over a fine stone or wheel. Then polish them on the 4/0 paper. Upside down, the tip of the liner should be rounded. This lets you "roll" the liner when cutting to taper the shading lines. Be careful not to dull the sharp points of the lines of the liner .... when done ... pull the liner over a piece of leather to remove any burr from the cutting tip. I've also taken the time to polish the silver blanks. I'll work out any scratches up to 2000 grit. I think the least amount of time against the buffing machine is always a good thing. I'll get a mirror shine without any small pulls (or holes). I'll work on a simple design for our Argentium (bottom) piece. Something that will emit the most amount of reflection through the top cutout scroll without being too complex/confusing to cut. We will wriggle cut the backbone, cut the belly and cap of each leaf cut, then shade with the liners and trim our leaves with the end cuts. Tons o' fun!! ![Smile[2]](/images/smilies/top smiles/smile[2].gif) I should be able to cut this tomorrow as all is prepared ... tools sharpened etc. Catch ya later, Chris |
|
#6
|
||||
|
||||
|
More preparation here as me and dum dum (the dog) gotta go to a cookout ... you are probably wondering when I am going to start cutting. Well, I'm wondering how much longer this project could possibly get delayed!!!
It's kinda cool that I'm doing this tutorial as Steve has recently announced the new western engraving class with Ray. What I've learned through self study is probably only the tip of the iceberg of knowledge that can be learned in a specialized class. This "nickel tour" of the style can get you started and prepare you for a professional class. Pursuing further self study can help add to your skillset but I would certainly recommend a course if you will be doing western engraving frequently. I've come up with this design for our Western bright cut layout. So much for simplicity ![Smile[2]](/images/smilies/top smiles/smile[2].gif) 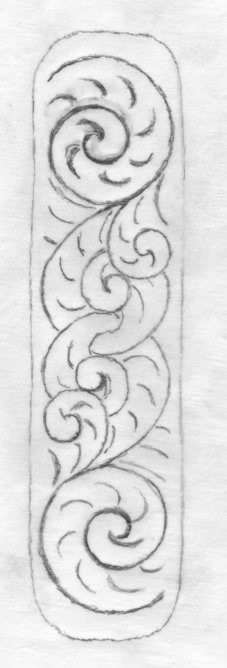 I've added the leaf lines for this tutorial. It is good to draw them in to get your spacing and overlapping correct. I usually just draw right on the metal with a sharpie or scan in an actual size drawing for transfer with acetone as I am doing right here. Affix the silver (polished 22g Argentium here) to a wooden block using two sided tape .... try to make one a little longer (or as long) as the length of the bracelet. When engraving the ends, it tends to get a little springy on a short block making it difficult to cut. Mine's a little short but I'm used to it now. 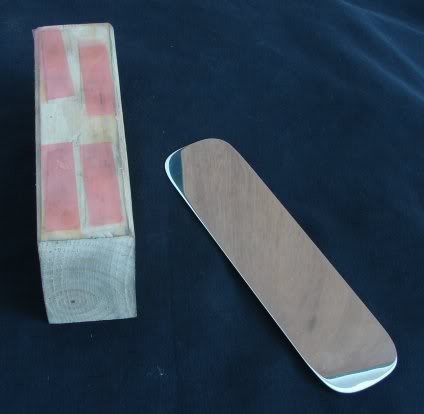 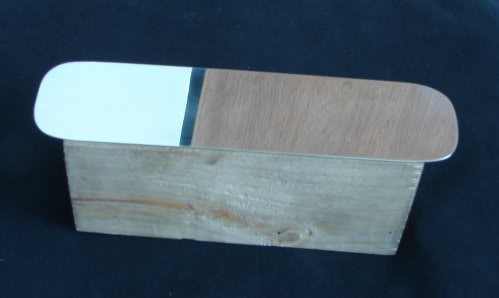 Now I've printed the design on a laser printer and transferred it to the Argentium (using a little acetone on a cloth) which is now on the block in the engraving block. 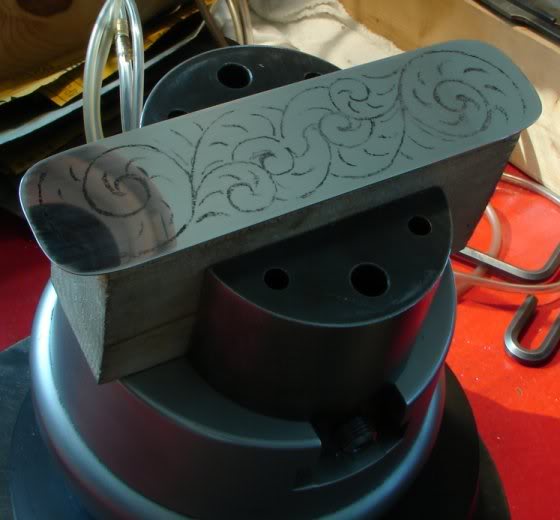 All set to wriggle cut the backbone ..... here's the #38 in the handle and ready to go .... 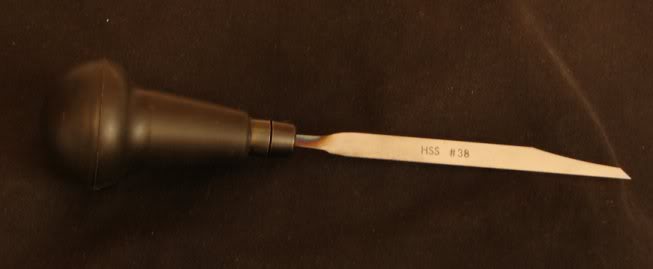 Next will be a scope shot of the wriggle cut and the finished backbone. Wriggling is done by rolling (from side to side) the graver as you push it or move it around the backbone of the scroll. The motion is all in the wrist as you turn the vise for smooth curves. See you later tonight or tomorrow .... Chris |
|
#7
|
||||
|
||||
|
Thank-you "M" ...
Hope everyone is having a great labor day weekend. No vacations here in the middle of nowhere unless I wanna watch my "hobby" farmer neighbor drive his tractor around and around and around. Haha!! ... now onto the cutting sub-subsegment of this western bright cut sub-segment. Wriggle the #38 around the backbone as described earlier ... don't mind the small scratch, getting a scope shot while holding tools to the work is a challenge. As a note, most minor scratches will be cut out, covered during execution or buffed out during the final steps. 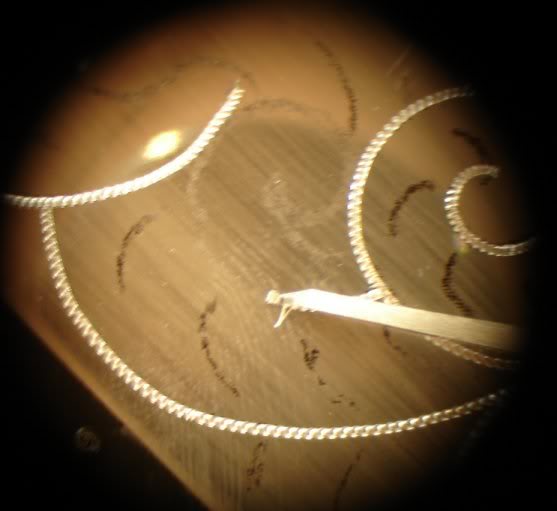 Here are the completed wriggle cuts 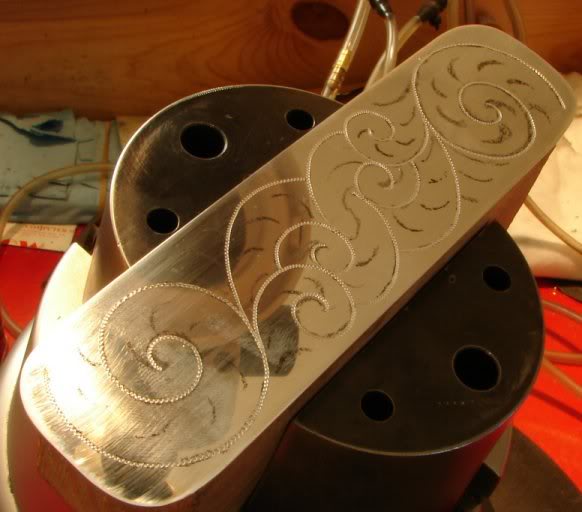 We begin the bright cuts. This is the most difficult part for the beginner because of the control needed to make these cuts. Practice in copper plates making cuts in both directions. The cuts that flow to the right will use the opposite tip of the graver as I explain them here with these cuts moving to the left. If you walk out of a class feeling frustrated ... this will be the single reason why. I like to make a small bright cut which is for the top of the previous leaf before making the belly cut and cap cut. This cut can best be described as a "cat claw" cut. When cutting to the left as in this example, make the cut using the right tip of the 45 flat....  Make the belly of the bright cut beginning at the start of your previous cut (using the left tip of the 45 flat when cutting to the left). Roll the the graver to the right to widen the cut. You should have a tapered "V" as the two cuts are connected. 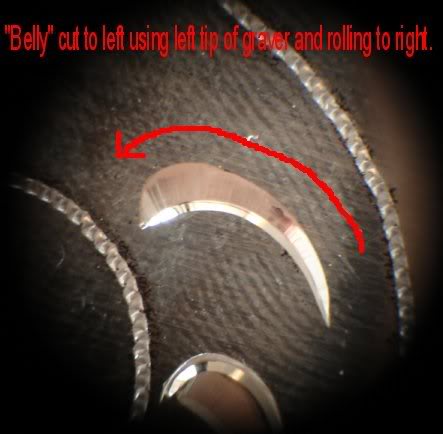 Next is the "cap" cut. This is the bottom of the next leaf and the top of the bright cut. 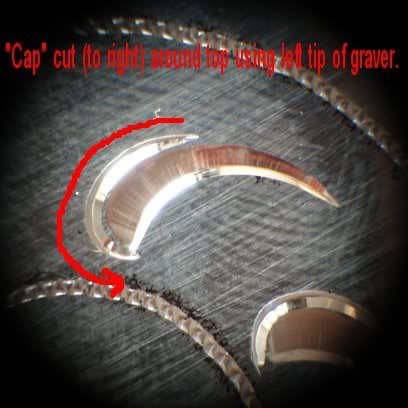 Here is the bracelet with completed wriggle and bright cuts .... I should have added another leaf or two in the larger scrolls as I like to have the liner fill the leaf. More bright cuts are better too. Gotta have the bling bling! 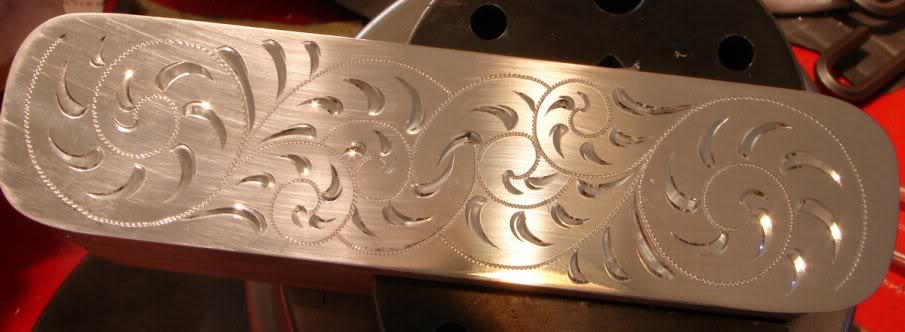 Next is the liner application. I ended up using the 18-10 for this entire piece because of the large leaves. If I had a larger liner for the large scrolls ... I would have used that on those ... Begin the liner on the backbone and run it into the leaf. Start the next liner run at the backbone where the last one curves into the previous leaf. This is just one way of doing this. I think it looks pretty good and gives nicer flow than using a separate liner around the backbone with separate cuts into each leaf. 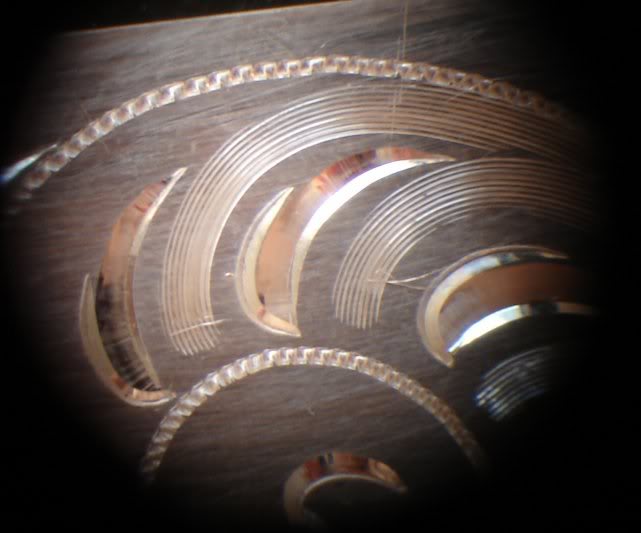 Here's a shot of the piece with all liner cuts completed at this stage of cutting.  Next come the leaf end cuts. This adds a another bright cut, cleans up liner cuts. 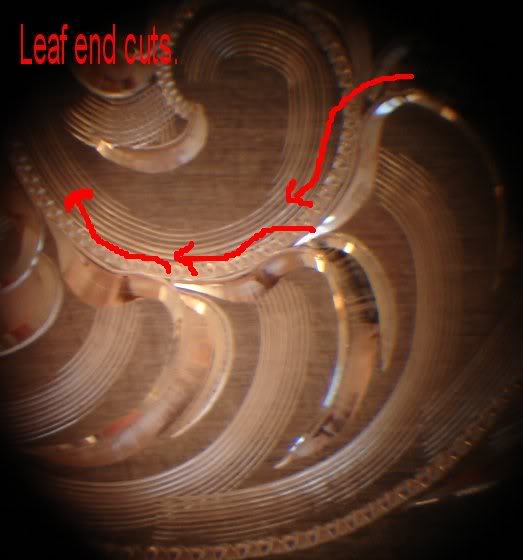 Now this thing is pretty much done. Last are some small cross cuts with the liner at the ends of each leaf. Also, long liner cross cuts across two scrolls where they originate from a common point. Here I have lightly sanded with the 4/0 paper one last time before I run this over the buffer quickly and put it in the ultrasonic cleaner (with Magic Luster rouge remover and warm water). 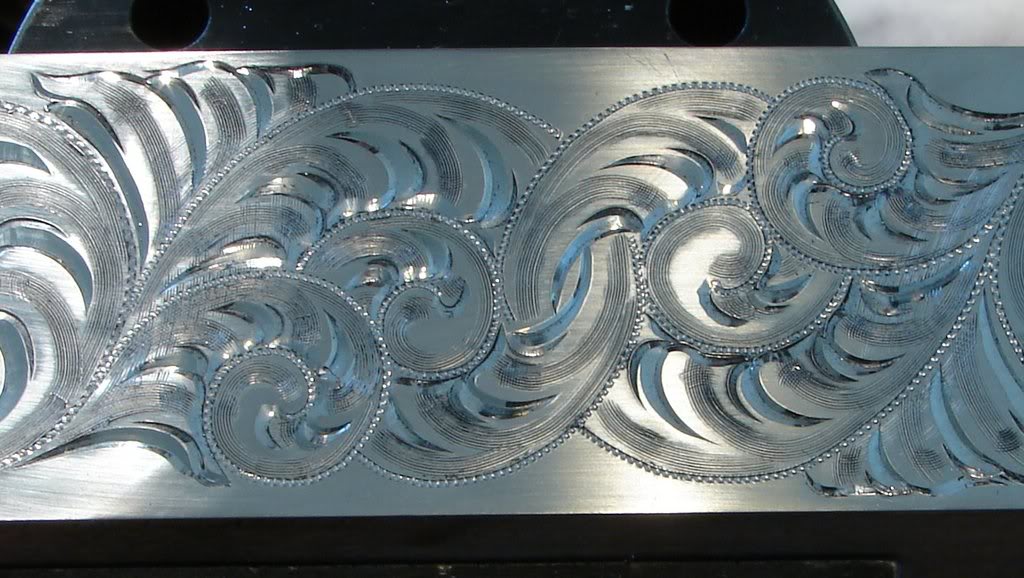 Since this is the bottom layer of the open-work and these are going to be soldered together with a decorative wire on the edge, I am not going to do anymore to this. Normally I would do a wriggle border just inside the edge then diamond cut the edges by rolling the 45 over the edge. As for cutting Argentium. This stuff came "dead soft" and is a little harder than standard sterling. I noticed a little more resistance in cutting which I had to get used to since this is the first Argentium I've ever done. It's really no big deal. I'll post a photo of this after it's been buffed and cleaned when I begin the second segment of cutting the open-work top part of this bracelet. I will cut the outline of the stencil posted previously with a 120 degree graver, drill holes for the jeweler's hand saw blades in each of the areas to be cut out. Then we travel to see my old friend Don Reid in Clay County. He's a fellow hermit, a retired jeweler and now makes pewter. He's got all the gear to cut and solder silver. Besides ... his wife is a darn good cook. Catch ya later, Chris |
|
#8
|
||||
|
||||
|
Here's a photo of the polished and cleaned Argentium bright cut (above) along with the open-work ready for the hand saw. The scroll outline has been cut with a 120 degree graver and the holes have been drilled for the saw blade to be put through and reconnected. I opted to have the scrolls flowing in the same direction to compliment one another.
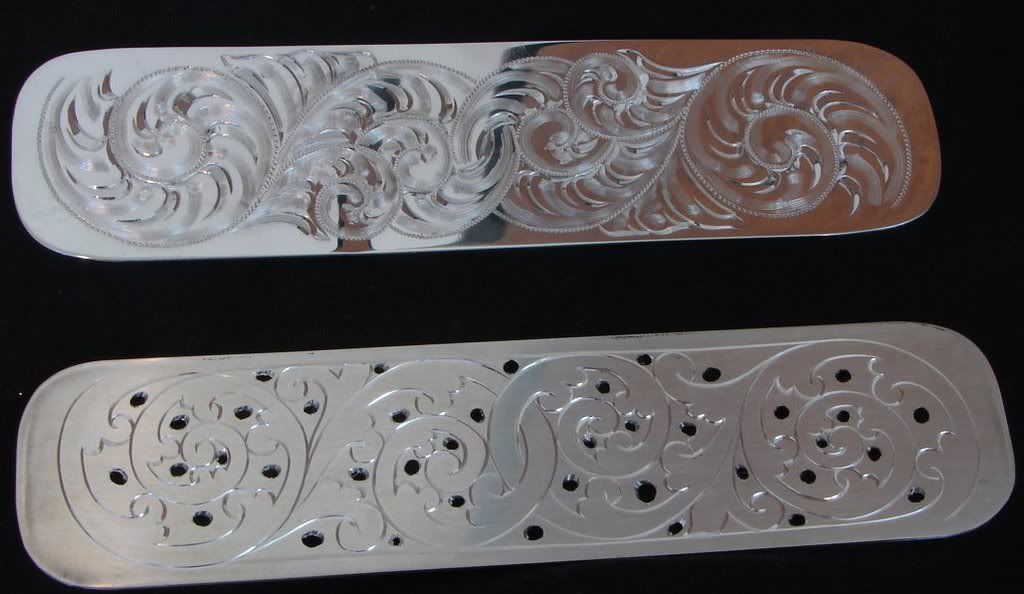 I cheated on the hole drilling ... too lazy to take the silver out of the engraving block so I used a high speed rotary with a carbide tip which I plunged through the silver. A drill press would've been far better. We're off to Don Ried's underground pewter shop to break his saw blades and good a good home cooked meal ![Smile[2]](/images/smilies/top smiles/smile[2].gif) The open-work will be wrapped in clear packing tape before cutting to minimize scratches as the work is held in the clamp. Photos to follow. Gotta get "dum dum" in the truck and get on over there. The open-work will be wrapped in clear packing tape before cutting to minimize scratches as the work is held in the clamp. Photos to follow. Gotta get "dum dum" in the truck and get on over there.I'll be ordering the silver for the border from Rio Grande ... something decorative in solid and half round sterling wire. I'll get to the soldering section next week after this piece has been sculpted. I'll be using flats and a large round heeled graver fabricated from a blank....pics to follow of course. Catch ya later, Chris |
|
#9
|
||||
|
||||
|
Here's a couple of fotos to illustrate how the sawing is done. I think I counted 39 holes which means that one end of the saw blade has to be pushed through the tape at each hole and reconnected to the blade clamp on the saw.
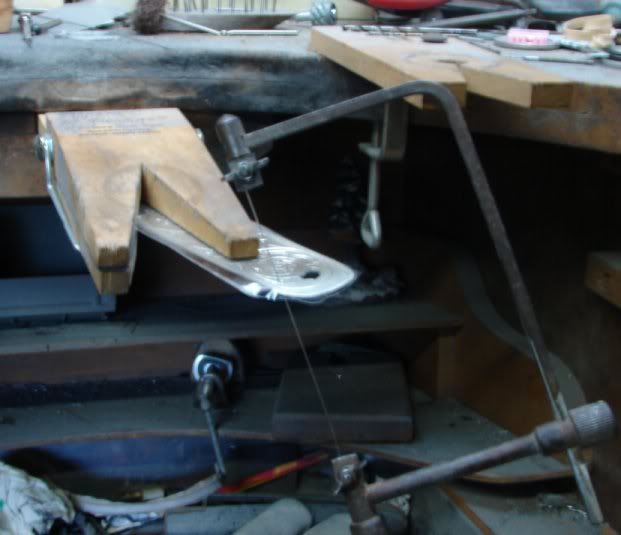 Yep ... that saw is a lot older than I am. So is my friend Don. He refused to have is picture taken for this. I met him at the 140th Gettysburg reenactment back in "ot 3". At the time I was burned out of computer work and looking for a new career. He suggested engraving. I thought about it and then sold everything. I'm glad I took the advice of that old guy telling stories in the woods at Gettysburg. 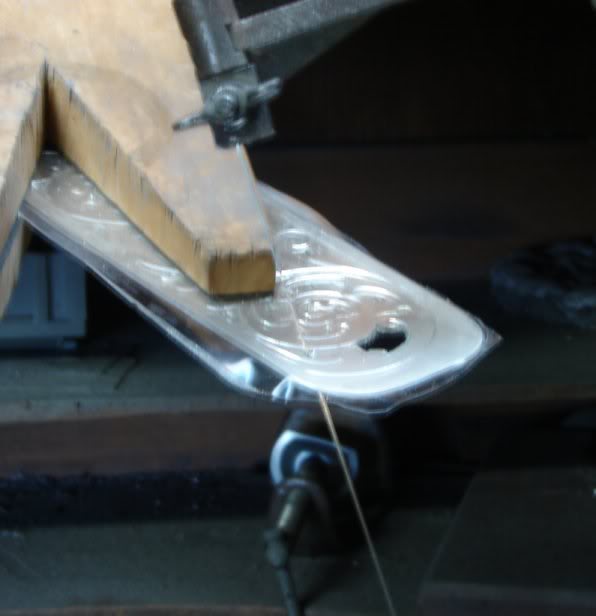 Here's the rough cutout.  This piece now goes back into my engraving vise where I will use small files to clean up the edges, then a 45 and 40 flat to sculpt the scroll. I think metal removal is far more efficient than metal displacement. See you Monday as I'll be getting ready for the Harrisburg, PA show with Ron P. Nott. Looks like this tutorial will squeak in just under the wire. Catch ya later, Chris |
|
#10
|
||||
|
||||
|
I've begun sculpting the open-work scroll using a 45 flat and this round heel graver made from a round blank.
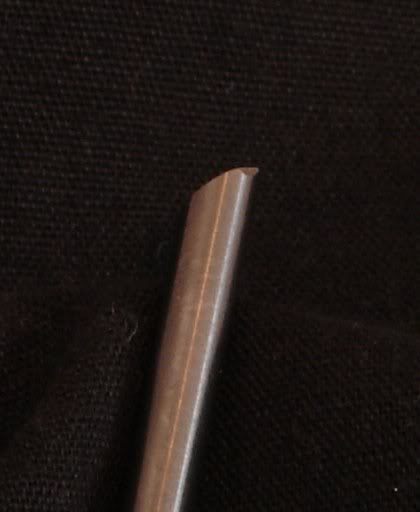 It has a 45 degree face and a small heel created by rolling the round cutting tip over the porcelain wheel at 15 degrees. I have also narrowed the width by slightly grinding each side at 45 degrees as I would a square graver. Using the round heel graver to cut the leaves, the 45 flat to round the backbone and some 600 grit paper to smooth the cuts .... this it what it looks like so far. 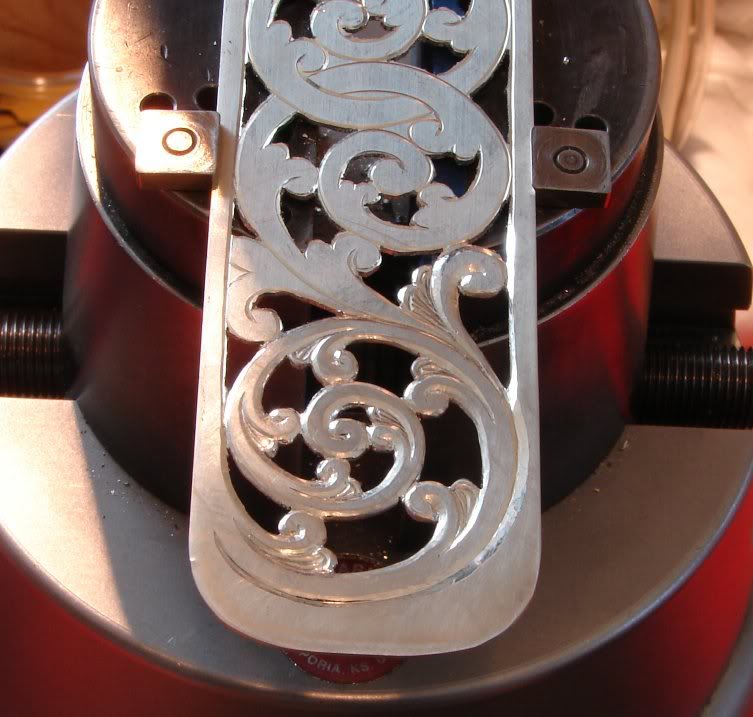 The decorative wire for the borders came from Rio Grande today. Should have the sculpting done by Wednesday as well as the antiquing. Thursday it is off to the jewelry store in Charleston to learn to solder and get this done ... just under the wire!! Chris |
|
#11
|
||||
|
||||
|
I'd like to put a question to the audience ....
This open work is turning out great. I'm thinking that I might not solder this on top of the other but remove the border that scroll is contained in and leave it as a scroll bracelet. Just a thought .... when it is done, I'll post a picture of it on top of the other after the antiquing and polishing is done. It looks kinda wild with the bright cuts behind the sculpted vine scroll. So far the vision is taking shape. |
|
#12
|
||||
|
||||
|
ok ... we're goin' all the way!!!
Here's a photo of the sculpted/carved open-work ... I buffed it quite a bit to smooth it out. 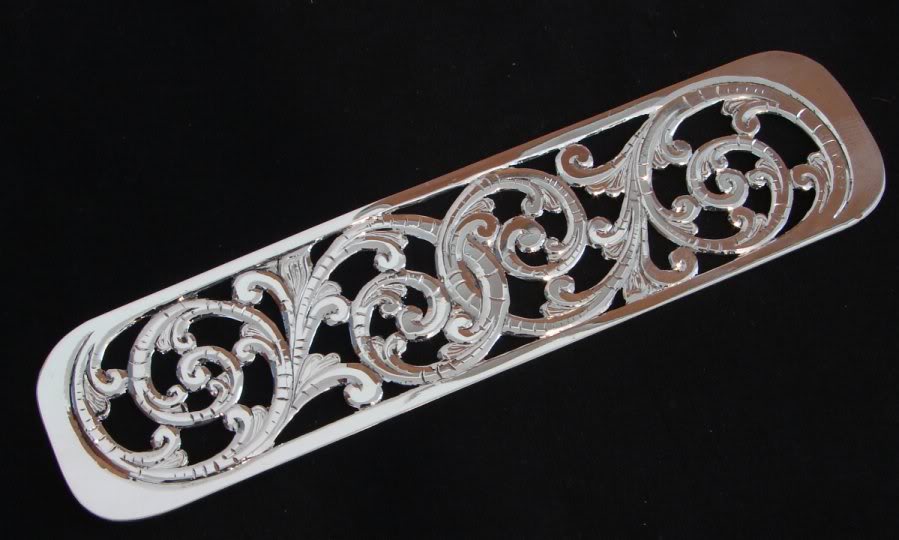 Here's a sneak peek of the open-work on top of western bright but ... wow!! 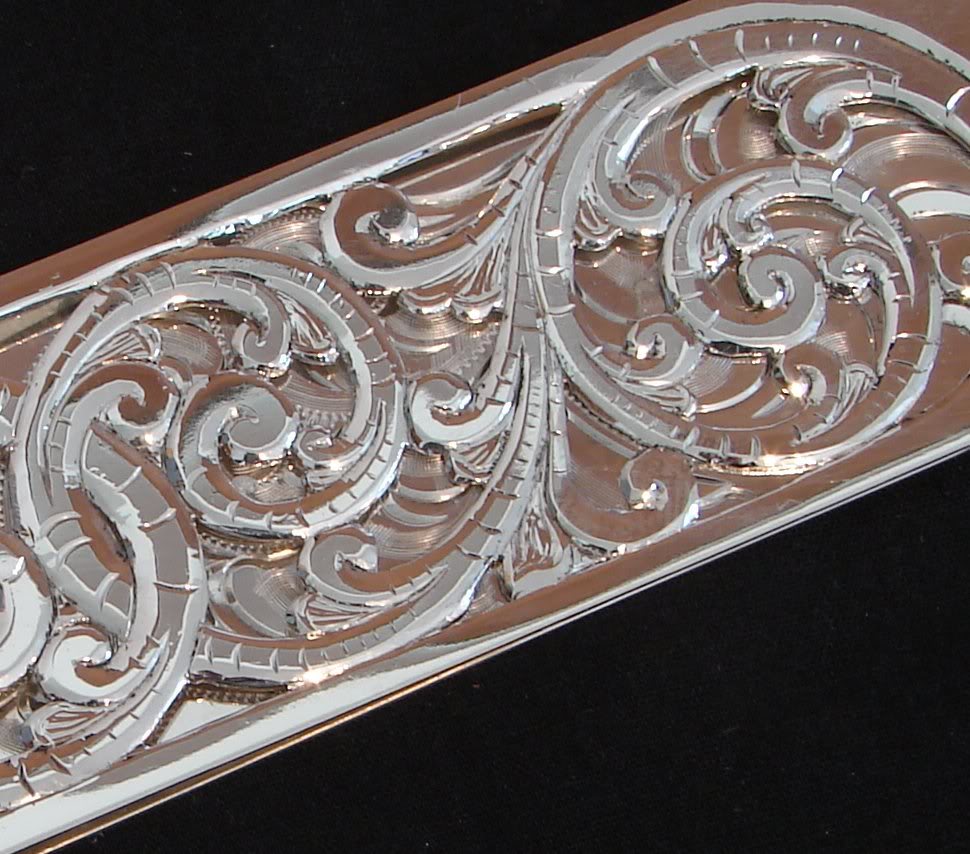 Some Black Max antiquing solution (from Rio Grande) on the top, a quick buff .... and I'll be back in a little bit. Chris |
|
#13
|
||||
|
||||
|
As a follow up to the sculpting.
A thread by Ron Smith on Transition style engraving was very helpful. Also essential is FEGA Journal #78 and #79 ... back issues available if you are joining. In the article on sculpted scroll, Weldon Lister discusses metal displacement using a number of custom made tools. I believe there is an article coming up in the next issue illustrating sculpting using metal removal or carving. Kinda what I did with this piece. See you tomorrow, Chris |
|
#14
|
||||
|
||||
|
I've been trying to get a decent photo of this because the last one sucks.
The light reflecting out of this is making it difficult ... here's another one. Remember that the outside edges will be covered with decorative wire and the inside edges will be filed and cleaned up a little more. One of the important things is that you all know that I cut this by hand (and it's pretty obvious) and not with the $30,000 laser at the store. The use of the saw is to make this tutorial accessible to those with affordable tools. The trick is to spend more time filing and sanding to make it less obvious ![Smile[2]](/images/smilies/top smiles/smile[2].gif) 
|
|
#15
|
||||
|
||||
|
Here's a re-post from the comments section. Anyone that comments here in this thread will be answered in the comments thread in the regular forum ... thank-you...
------------------- ok Roger ... you triggered an obsessive compulsive moment with the word "calculate". Please remember everybody, that I am not a mathematician or geometry wizard nor have I ever played one on television. Let's consider this to be a hollow cylinder in which a hollow cylinder is a solid bounded by two co-axial cylinders of the same height. C = outer circumference c = inner circumference D = outer diameter d = inner diameter R = outer radius r = inner radius Constants Pi = 3.14 C = 6 inches (or standard bracelet length) Formula: D = C/Pi or D = 6/3.14 = 1.9 R = 1.9/2 = .95 We also know this: 1. Open-work/top sterling thickness = 20Ga = .032" 2. Square wire separator = 12Ga = .081" 3. Western/bottom sterling thickness = 22Ga = .025" for a total thickness of 0.138" Our inner radius (r) = .95-0.138 = 0.812 Our inner diameter (d) = 0.812 X 2 = 1.624 inner circumference (c) = pi X 1.624 = 5.1" Basically, I need to remove less than .5 inches from each end of the bottom layer. Technically I should split the difference between each of the thicknesses of the top and bottom pieces (average). In order to keep this simple :smilie ![Lol[1]](/images/smilies/top smiles/lol[1].gif) 5: for our fellow readers (and Conservative) I will just exclude the thickness of the bottom layer in calculating the inner radius. 5: for our fellow readers (and Conservative) I will just exclude the thickness of the bottom layer in calculating the inner radius.That inner radius, excluding bottom thickness of the western bright cut, is 0.95 - 0.113 = 0.837 our conservative inner circumference is now: c = pi X (0.837 X 2) = 5.256 ..... let's call it 5.25 inches. That's 3/4" less than our standard bracelet length of 6 inches .... So, I'll take about 3/8ths of an inch off each end of the bottom layer. QED (and just in time for lunch) |
|
#16
|
||||
|
||||
|
As I mentioned ... flying by the seat of my pants is fun so I antiqued the top scroll, lightly buffed it and formed both bracelets around the mandrel ...
I like to wrap them in a soft cloth before I whack them with the mallet. 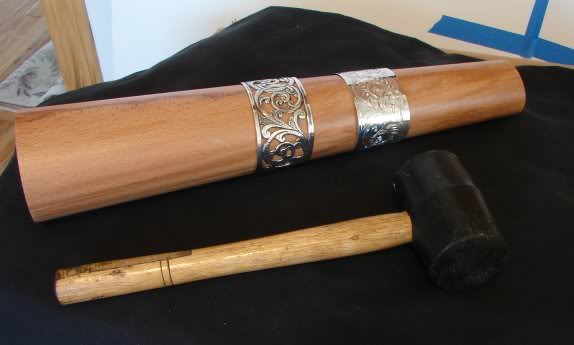 Let's see if my calculations are correct in grinding off about 3/8" from the ends of the bottom piece ....  With a quick measurement and taking into account that there will be 12Ga wire between these two as well as the fact we are not forming a complete cylinder ... I'm right on the money. I'll remove between 1/4" and 3/8" from each end after I straighten the inside piece out. I initially guestimated that it would be less so I will lose a little bit of the Western cut design from the ends. A mistake I will not make again on the next one I do like this. Here's a photo of the 12Ga square wire, decorative end that will be soldered to cover the separation and the 1/2 round beaded wire which will cover the inside edge of the border. 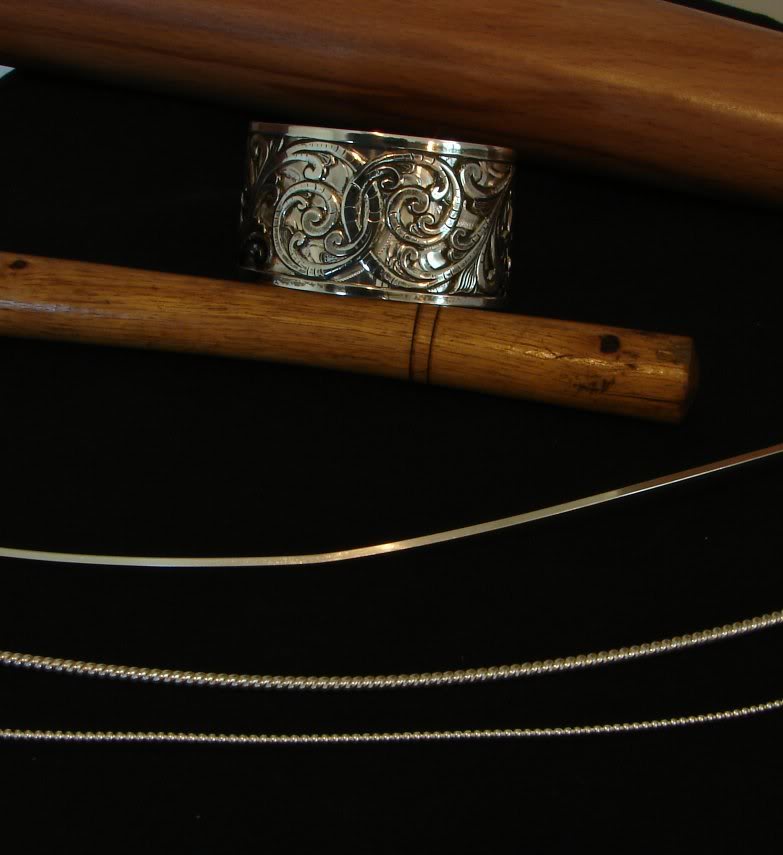 Yep ... this thing is gonna rock. See you tomorrow for the final installment of soldering these together!!! |
|
#17
|
||||
|
||||
|
Before heading off to the jewelry store, I flattened the western piece and shortened it by almost 3/8" on each end. I then engraved "my mark" on the back and reshaped it around the mandrel. Number "001" as the this is the first and made upon request of the store.
 --------------------- Some things had to go out the window ... like the square wire to separate the two pieces. Even annealed it was too hard to shape for proper assembly so I used a beaded wire of similar thickness. It was easy to bend. It was tack soldered in a few spots to hold it together then the rest was soldered all the way around ... every other inch. Here boric acid is painted on the surface to prevent excessive discoloration from the heat. 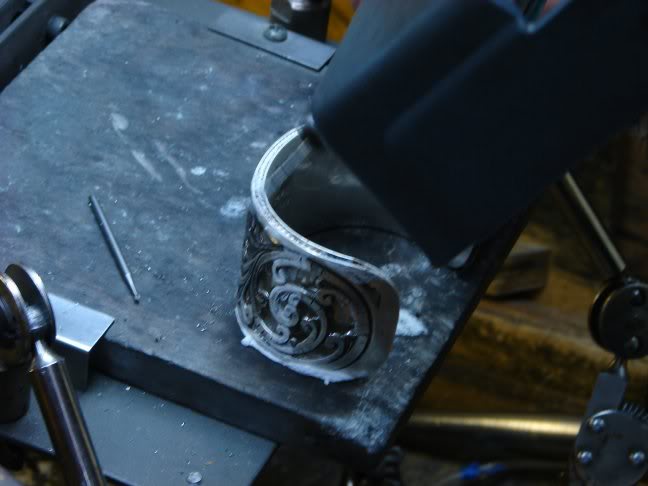 This next step is where flux is brushed along the edge. 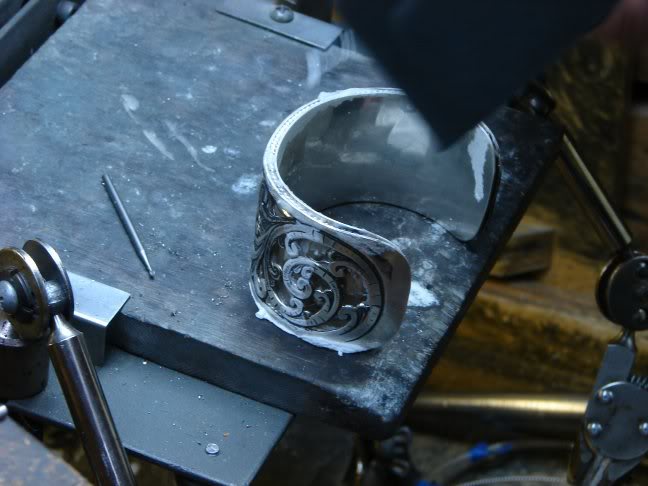 Then pieces of silver solder were placed on the edge and heated until they melted....using sweeping motions with the torch so as not to melt the bracelet.  The thick decorative wire edge was very difficult to form. It had to be annealed with the torch then soldered to one end .... soldering and holding as it was worked around the edge. It was done in two pieces ... meeting at the both ends of the bracelet. It looked pretty rough after the heat (sorry no picture as I got a little obsessive about how this was going to turn out. After dropping this in the ultrasonic cleaner with detergent and ammonia, things were looking good. The Argentium picked up very light hughes of pink, light blue, and straw as well as white leaving a pearl like coloration on the polished surface. Argentium was a good choice for the bottom piece. With this nice contrast, the antiquing of the top was abandoned for a high polish luster. The colors in the background really seem to move as the light hits the bright cuts. I also tossed aside the half round bead that was intended for the inside edge of the rope border. Thought it looked just fine without it ... besides, we were running out of silver solder. Here's the completed bracelet ... 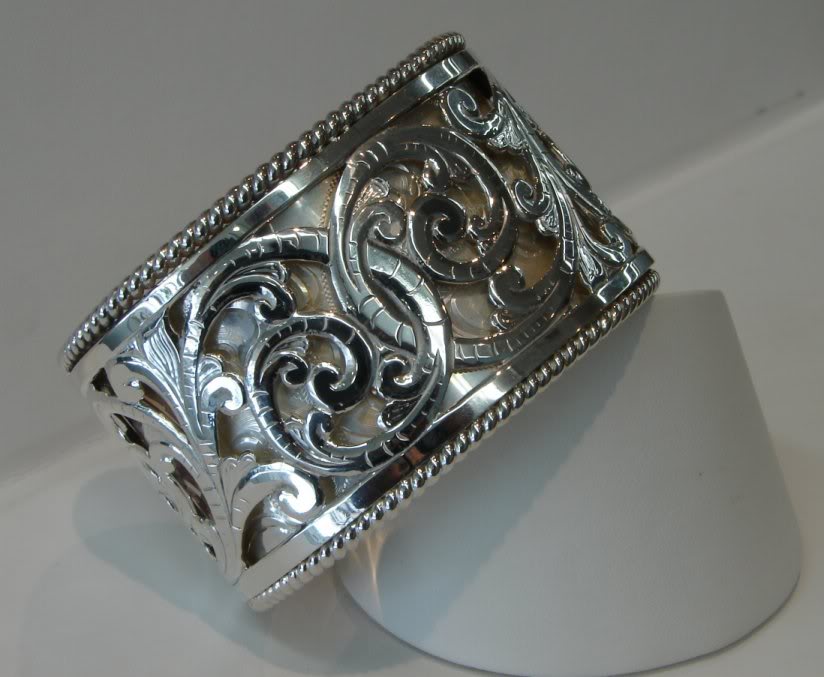 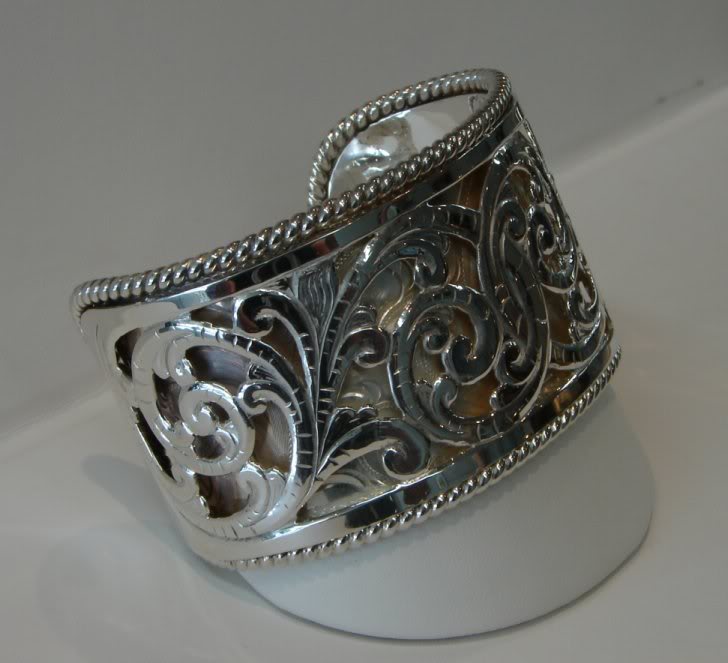 I sure learned quite a bit on this. Going over the top is always the best way to learn anyhow!! I learned how to solder, how Argentium reacts to heat and how to make a double layer bracelet. Whew ... time for nap. Thanks for following along ... I think it came out pretty good even though a little different than what I expected. |
 |
| Bookmarks |
|
|